Introduction
In my current role as a Service Desk Analyst, the service desk/ticket management software we use is ServiceNow. During the few months I have been using it, I have been constantly optimising how I use it, as one of the things I always do is try to use a system as efficiently as possible so as to not waste time and to get the most out of it and streamline the process.
I’ll share some of the features and processes I have set up to allow me to work as efficiently as possible. Let’s get started.
1. Set Up Favourites & Filters
If you’re not already using the Favourites pane on the left hand side of the screen, you are severely hindering your efficiency and productivity. I have the following favourites set up:
- Home
- All Incidents
- All Requests
- My Open Incidents & Unassigned
- My Resolved Incidents
- Create New Incident
I’ll explain each of these and the filters I have used to set them up. To set up a filter and add it to your favourites pane, open up the pane on the left that shows all categories (‘All applications’) and open ‘Incidents’. You will then need to press the filter icon (funnel). After setting up the filters, you press the ‘Save’ button at the top, which will then add it to your favourites.
Home
This is self-explanatory – I use this to take myself back to the homepage (instead of the link in the far top left corner as I’ve used Stylus to alter the CSS to remove the title in the top left – although this is just a personal decision to make the interface minimal and not something I’d necessarily recommend). I don’t use the homepage often; mainly to keep an eye on daily/weekly tickets resolved and view some other stats specific to our organisation.
All Incidents
This shows a list of all incidents, including those assigned to other analysts. This has a few uses, but the main ones I use it for are:
- I can use the search bar at the top of the list to search for specific text (after changing the dropdown to ‘For text’). This is useful when I am looking up solutions to a problem I’m trying to resolve. For example, I can search for ‘Outlook credentials’ and see what steps either myself or other analysts have used to fix a problem on previous incidents/tickets.
- I can set the ‘Creation date’ to show incidents in descending order (newest first) so I can easily find a ticket that a colleague may have mentioned or wants my input on, or to see if a recurring issue has been raised by multiple users on a particular day
I’d say it is definitely worth having this on your favourites as it can come in handy. To add this to your favourites, simply select the ‘All applications’ button on the navigation pane on the left side of your screen and press the star icon under ‘Service Desk -> Incidents’.
All Requests
I personally do not deal with request items as these are handled by another team. However, people do call up, raise tickets and start webchats for these, so it can help to have them – although ultimately I tend to use the global search in the top right of ServiceNow to find these. I’m sure people who do handle requests would get more out of this than I currently do.
My Open Incidents & Unassigned
This is the favourite/bookmark that I use most frequently and would strongly recommend considering setting it up in a similar way. One benefit is that it allows you to keep a close eye on your own tickets for any updates. Another is that you can see when a new ticket comes in so you can triage it as fast as possible, reducing the chance of breaching any SLA in place.
You should click the ‘Last updated’ column heading so it is descending (newest first). This makes any new updates by either a resolver group or the end user appear at the top of the list. It will also cause any new tickets to appear at the top (easily distinguished by the ‘Pending’ status).
Initially, I had it set up so that I would manually click the bookmark/favourite every so often (sometimes 10 seconds, sometimes 30 seconds). I then trialled the ‘Super Simple Auto Refresh‘ plugin to refresh the page every 10 seconds, with ‘Pending’ set to the notification text (so I would hear an audio cue and receive a desktop notification when there was a new ticket). However, I found this to not be quite what I was looking for, because if I had a webchat open it would refresh the page and I would need to manually pause the plugin.
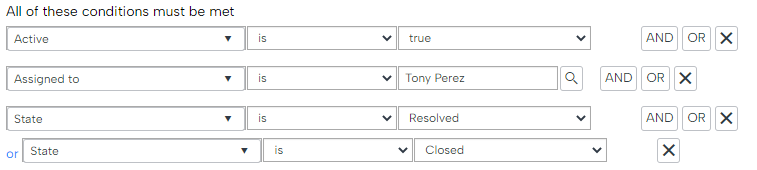
I now use the ‘Activity Stream Flyout’ feature alongside this filter. I will cover this separately later on as I believe it deserves its own writeup. Even if you do not plan on using the activity flyout, you should set up your filters as follows (whilst on the ‘All Incidents’ screen as described above, replacing my name with yours):

My Resolved Incidents
Having a list of all of my resolved incidents is handy, especially when I receive an email notification where the end user has updated their ticket (e.g. with a query or further problem) instead of un-resolving it. It means I can just click the link in my favourites pane and find the one that they have updated (I usually look at ‘Updated by’ as all of them except for the one they’ve updated will have my initials, so it’s easy to spot).
To set this filter up, ensure you are on the ‘All Incidents’ screen and use the following filters (replacing my name with yours):
Create New Incident
This lets you easily create a new incident without having to navigate through different menus, which is especially handy when you answer a phone call and need to raise a new ticket. You can simply find ‘Incidents -> Create New’ in the list containing all links and press the heart to add it to your favourites.
Customisation
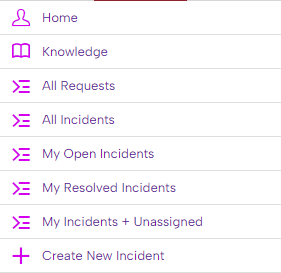
I have customised my favourites so that they read as above. You can click the pencil icon next to the favourite to rename it as well as change the colour. For example, I have the ‘Home’ favourite set to a picture of a house; the ‘Create new incident’ favourite set to a plus symbol; and the others set to a list icon. This isn’t necessary, but can save your brain that extra bit of effort.
Here’s how my favourites list looks – although please note that the ‘My Open Incidents’ is now redundant, and it is up to you if you wish to include the knowledgebase (if it has been implemented/populated in your organisation):
2. Call & Chat Handling
When I answer a call or accept a webchat, I start off by taking the user’s name (when answering a call, as the webchat already gives me their name) and instantly search their name using ServiceNow’s global search whilst they explain their issue. The main purpose of this is to find out if they have already raised an incident or request, as this can save a lot of time and duplication. It can also save the user having to read out a request number or incident number, and will reduce the duration of the phone call or chat.
If it is a new issue, for phone calls I always open a fresh Notepad instance on my computer (as it is fast and easy to open) and just start typing the main points they are saying. As I type at a similar speed to how people speak, I tend to transcribe what they are saying word-for-word, but this isn’t necessary; the main point is to take notes of the issues they are experiencing, including details such as error messages or actions they took that led to their issue arising. This can be especially helpful when you are busy and has saved me a lot of brainpower and improved my overall ticket quality, as I am able to include every step they took and troubleshooting steps they may have tried; all of which can be extremely helpful when included in the incident description or resolution notes, particularly for other colleagues.
In the case of requests, it can improve the user’s overall experience if they are starting the call by saying ‘I put in a request…’ and you already have the request open with the latest notes, so you can give them an update quickly without them needing to wait around.
In conclusion, utilising the global search feature and taking notes can be a powerful way to up your game when it comes to ticket management and customer service.
3. Activity Stream Flyout
This can revolutionise the way you track your tickets, whether they are new or existing incidents. As mentioned earlier, I used to manually refresh the page that had the filters ‘My Incidents + Unassigned’ every 10 or 20 seconds. That was until we discovered the Activity Stream Flyout.
When testing using this feature, I realised that it takes into account whatever filters you currently have active on the page you open the flyout. This means that when it’s active on a page that includes unassigned tickets, it will instantly appear at the top of your list. After this discovery, it was adopted by the rest of the team, and is proving invaluable in reducing SLA breaches and improving the time taken to triage the ticket.
Once you have set your filters up as detailed earlier, you should ensure you are on this page and have the flyout open. You will then be alerted instantly to updates to your tickets and any new tickets that come in.
I personally found it frustrating that it covered a portion of my screen that I liked to keep free (the right hand side of the ticket list that contains the last update and who updated it). You can download the Chrome/Edge extension called Stylus and modify the appearance of the box using CSS. The code I have written to modify the box is as follows:
.list_stream_reader {height:410px;top:483px!important;font-size:12px!important;right:942px!important;border:6px solid #5f219c;box-shadow: 1px 1px 5px 5px rgba(0,0,0,0.3)!important;visibility:visible!important}
.list_stream_reader iframe {margin:0!important}
.sn-card-component_headline{font-size:12px!important}
.list_stream_plank_header {height:20px!important;line-height:0px!important;background-color:#5f219c!important;color:#fff!important;top:20px!important;display:none}
.plank_close_button {background-color:#5f219c!important;color:#fff!important}
I should mention that this CSS is a bit messy and not very well optimised, but this is negligible in terms of performance and you can of course modify it as you wish. In particular, you may wish to change ‘5f219c’ to your desired colour (or remove the colouring entirely) – I have added this as it fits with the custom theme I have created for ServiceNow.
What this CSS does is moves the box to the bottom left of the screen instead of the right hand side, and shrinks it to half the size. It is sized so that it can roughly fit two updates into the box, which I’ve found to be adequate for my day-to-day work.
To conclude this section, I just want to stress how useful this feature is, and that you should look at adopting it into the way you manage your workload. I use this in conjunction with keeping an eye on my Outlook, as when I start the day it is usually easier to go through my emails than scroll through the list, although you may find using the flyout to be more practical.
4. Personalise List Columns
When viewing your list of incidents (based on which filters you currently have selected – which hopefully you should be viewing ‘My Incidents and Unassigned’), you can customise which columns are shown. I have removed anything I feel does not provide any value, and have all of the important information showing on the immediate screen. You can adjust which columns are shown by pressing the cog in the top left of the screen.

I personally find it useful to have the following shown (as per the screenshot above, but I’ll write them out anyway): Number (incident number), Opened (when it was created), Short Description (incident title), State (usually In Progress or Awaiting User Confirmation), Caller (user who raised the incident), Email (email address of the user), Updated (date/time updated), and Updated by (who last updated the incident). In the screenshot I have ‘Assignment group’ included, but this isn’t necessary and you can remove it.
5. Use Keyboard Shortcuts
ServiceNow has only a few built-in keyboard shortcuts to perform actions in the software (like with other applications such as Gmail). In addition to these, you can use global Windows shortcuts to improve your efficiency in a few ways.
For example, when creating or triaging a new ticket, you have to use various dropdown lists to select different options (such as Category or Priority). To save time (which may seem negligible at first, but definitely adds up in the long run), I click the dropdown list and press the first letter on my keyboard of whatever the word starts with that you want to select.
An example for this is for the subcategory – let’s say I have selected Software for the main category and need to choose MS Outlook for the subcategory. I would press M on my keyboard to quickly make it highlight this option. Often I will type the first few letters (as we have a lot of subcategories), as whatever you type is what will be selected.
Additionally, for the impact, I will press the number of what impact the ticket has, instead of clicking. I can then instantly click on the next dropdown box as it would have already selected the option I typed.
Another use of keyboard shortcuts is after typing in work notes or ‘additional comments’, I press TAB on my keyboard three times to quickly select the ‘Post’ button and then press the spacebar to press the button. This saves some time after typing the notes as you will not need to move your hand from your keyboard to your mouse to post the comment/note.
The only shortcut specific to ServiceNow that I’ve found to be useful is Ctrl+Alt+G – this selects the Global search bar in the top right corner without needing to use the mouse.
Final Thoughts
These are some tips and tricks that will hopefully help you improve your ticket management using ServiceNow. I will update this post as and when I discover better ways to use the application. Note that all of these may not work specifically for you, and you should implement those that seem most relevant to your organisation and the way you work.
A final tip is when I start my shift in the morning and need to update each of my tickets, I open up the ‘My Incidents and Unassigned’ favourite and set the ‘Updated’ column to show the oldest first. I select the ticket at the top and update it as required. I then click the favourite again and it will show me the next one that needs to be updated. You’ll know that you have updated them all once the ‘Updated’ column contains today’s date. If you wanted to take this further, you could set up a new filter that only shows tickets assigned to you that have not been updated in one day.

